Stylized Toolkit: Atlas is a texture atlas addon for Blender. Color your 3d models with nothing but a color palette texture and your model's UVs! Included are features for defining swatch grids on your materials, quantizing selected UVs to swatch grids, and moving, selecting and copy / pasting the UVs within the swatch grids. This is a workflow tool for efficient coloring of models that benefits retro and non photo real styles.


All artwork that you create with the addon can be for commercial, personal and educational use. The addon itself is licensed under the GPL.
Note, the "STKAtlas_BlenderAddon.zip" contains the "blender_manifest.toml" file, which makes it compatible with Blender Extensions for Blender 4.2 and up. If you are using Blender 4.2 or above, the Extensions features that are built into Blender may cause Blender to attempt to access the internet. So if you are using Blender 4.2 or above, and you want the addon to install without the Extensions features, install the "STKAtlas_BlenderAddonNoExtensions.zip" instead. It is exactly the same as the other zip, except it does not have the "blender_manifest.toml".
Blender 3.4 -> 4.1:
In Blender, go to Edit -> Preferences -> Add-ons. In the upper right corner, click "Install...". Navigate to and select the zip file of the addon "STKAtlas_BlenderAddon.zip" and click the "Install Add-on" button.
Blender 4.2 and onward:
In Blender, go to Edit -> Preferences -> Add-ons. In the upper right corner, click the downward pointing wedge icon then click "Install from disk...". Navigate to and select the zip file of the addon "STKAtlas_BlenderAddon.zip" and click the new "Install from disk" button.
From there, with any version of Blender, Installation may take more than a few seconds. Next, if the addon shows immediately with the title "Workflow: STK Atlas" or "STK Atlas" and the check box to its left is checked, you are good to go. Otherwise, you may have to uncheck the "Enabled Add-ons Only" button and type "stk" in the search bar, and then ensure that the addon is enabled by checking the "Enable Add-on" check box to the left of the addon's name.
Important note: STK Atlas materials are only valid and detected when in material slot 1 of mesh objects. Other material types can be in other material slots, and the addon will always ignore them. Also, edit mode selections are detected only via Blender's "Face selection mode".
Create a texture in your image editor (or use one of the textures supplied with this addon) that has color swatches arranged in a grid pattern. The easiest way to do this is to have each pixel in the image as a separate swatch. Gradients will work too. Palette textures can either be for all solid colors, all gradients, or a mix, with the gradients running horizontally on the bottom (more on this later). Consult the palette textures supplied with the addon to get an idea on how palette textures should be arranged.
Next, set up a material with your palette texture manually, or, use the "New" button to open up a file select dialog to select the texture from your file system. A material will be made automatically with the texture in that case.
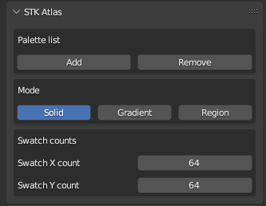
Next, define the swatch grid of your material. With your mesh object active and selected (it must have a material in material slot 1 at this point, and make sure that it is the active slot), head over to the Material properties tab in the properties area, and find the "STK Atlas" panel.
"Solid" color only palette textures:
Make sure the "Solid" selector option is active (this is the default). For example, if you have a 64px by 64px image as your palette, enter 64 for both the "Swatch X count" and "Swatch Y count" values. If your swatches are bigger than a pixel, just make sure the dimensions match the horizontal (X) and vertical (Y) count of swatches in your texture.
"Gradient" only palette textures:
Make sure the "Gradient" selector option is active. Gradients must always be horizontal in the palette textures. There are multiple ways to proceed. If you want to be able to move the UV selections inside the lengths of individual gradient swatches, it is recommended to just use the pixel resolution for the "Swatch X count". The "Swatch Y count" should be the number of gradient swatches, stacked vertically. You can also set the long (horizontal, X) side of the gradients to a value of 1 if your don't want to move UVs inside the individual gradients.
"Region" Gradient and Solid color palette textures:
Make sure the "Region" selector option is active. Set the "Gradient region rows" value to the number of gradient rows present. The Gradients must always be at the bottom of textures, with the gradients running horizontally. This number represents the top-most gradient row, with all other gradient rows below it, and all Solid color swatches are above.
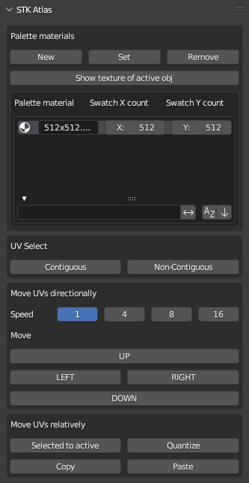
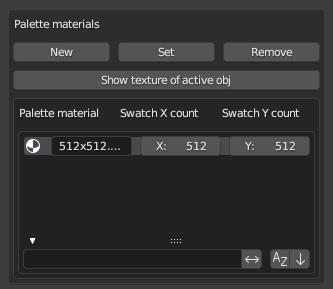
Set your palette material to material slot 1 of a mesh object by using the "Set" button [1], or, by placing it in material slot 1 manually. STK Atlas materials only work when in material slot 1. The "Remove" button [1], [2] will remove materials from the palette materials list. On the STK Atlas Material properties panel [2], materials can be added to and removed from the palette materials list. Also, on the main 3D view panel [1], the "Show texture of active obj" button will show the texture of the material in material slot 1 (if an image texture node is connected directly to the Emission or Base Color input of a Principled BSDF) in the UV Editor panel, if currently open.

In the "PaletteTextures" zipped folder that came with the addon, you will find 3 example palette textures. Below are examples of the settings to apply to them using the "STK Atlas" panel found in the Material properties tab. The same concepts will apply to your own palette textures. The "Swatch X count" is the count of swatch columns. "Swatch Y count" is the count of swatch rows. Heights of swatches must always match each other. Widths of swatches must always match each other, with the exception being for "Region" palette textures, where the gradients must always be the width of the entire texture. It is recommended to create palette textures with a vector drawing app that has a "gradient map", "color ramp" or "color map" type of feature, but a raster app will work with some extra effort too. They could also be made in Blender with planes side-by-side, rendered with an orthographic camera to an image.
512x64_Solid.png
The swatches are all 1 pixel by 1 pixel in this example, and the image size is 512 X 64. Mesh object faces for "Solid" swatches do not have to be UV unwrapped, the "Quantize" button accomplishes this on mesh object face selections instead.
Mode: Solid
Swatch X count: 512
Swatch Y count: 64
512x512_Gradient.png
Gradient swatches must always be entire rows on your textures. The swatches are all 1 pixel tall in this example, and the image size is 512 X 512. If you want to move the UVs horizontally, you can just put the x pixel dimensions, 512, in the "Swatch X count". If not, put 1. On gradient textures, With gradient swatches, mesh object face groups must be UV unwrapped one by one, and rotated to the desired angle before clicking "Quantize". The "Quantize" button will respect the layout of whatever UVs that are selected as if they are for one swatch, and will resize them to fit the nearest swatch and to fit inside the UV area bounds.
Mode: Gradient
Swatch X count: 512
Swatch Y count: 512
512x512_Region-448.png
The "Solid" color swatches are all 1 pixel by 1 pixel in this example, and the image size is 512 X 512. Always size the "Swatch X count" and "Swatch Y count" values of "Region" textures as if the entire texture was a "Solid" texture. The last Gradient region swatch is located at row 448, counting from the bottom of the texture upwards. With "Region" selected, the context sensitive "Gradient region rows" value input will show. Gradients must always be rows, and have to all be at the bottom of "Region" palette textures.
Mode: Region
Gradient region rows: 448
Swatch X count: 512
Swatch Y count: 512
"Quantize" is used to place the UVs into a swatch.
"Solid" color palette materials and regions:
The selected UVs (while in edit mode) or all UVs (while in object mode) will be put into a swatch, centered on the selection. There is no need to UV unwrap for Solid color palette materials and regions.
"Gradient" color palette materials and regions:
The selected UVs (while in edit mode) or all UVs (while in object mode) will be put into a swatch, centered on the selection. Although not required, it is recommended to first UV unwrap and rotate your gradient swatch UVs, and then quantize them individually. Blender's "Smart UV Project" will work sometimes for this, but, it is recommended to mark seams and unwrap, to preserve face order in the UV map. This way, you can orient them the way you want. Scaling gradients horizontally must also happen manually in the UV editor (except for out of bounds x dimensions upon quantizing, which the addon does handle), while the vertical sizing, selections, selected to active, copy / pasting and movement is handled by the addon.

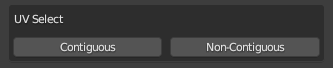
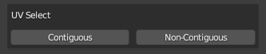
This will work in edit mode only, and on single and multiple mesh objects.
"Contiguous": Select at least 1 mesh object face that corresponds to a swatch, and press "Contiguous" for the addon to select all connected faces that correspond to the same swatch. The operator will do nothing if multiple mesh object faces that correspond to multiple swatches were selected initially, or if the selected face was not quantized.
"Non-Contiguous": Select at least 1 mesh object face that corresponds to a swatch, and press "Non-Contiguous" for the addon to select all faces that correspond to the same swatch. The operator will do nothing if multiple mesh object faces that correspond to multiple swatches were selected initially, or if the selected face was not quantized.
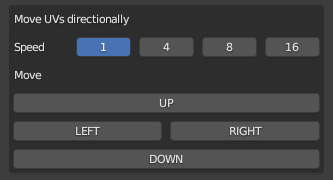
"Move UVs directionally" is for moving the UVs while keeping them within their swatch boundaries. The "Speed" corresponds to the number of swatches to move each time. This will work whether in edit mode or object mode, and on single and multiple mesh objects. Select some mesh object faces, click any of the buttons and the corresponding UVs will move accordingly. UVs will never move beyond the UV area, and Region UVs will stay within their regions. If you want to switch some "Solid" UVs or "Gradient" UVs to the opposite region of a "Region" palette material, "Copy" "Paste" or "Selected to active" will accomplish that. You can also move them manually, and click "Quantize" in case they didn't land exactly inside a swatch boundary. Set the "Custom speed" as an optional user-defined speed, which applies the "Custom speed" amount to the right-most "Speed" setting.

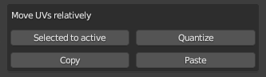
"Selected to active" is used to move the UVs of selected mesh object faces to the swatch of the active mesh object face, which is always the last selected mesh object face. UVs must already be in swatch boundaries, and operations between different objects only validate when the STK Atlas material settings match. This works in edit mode only, and on single and multiple mesh objects.
Select the faces of the mesh object(s) that you want to move to a different swatch.
Select one last mesh object face, which corresponds to the swatch you want the other faces to have and press "Selected to active". The UVs will be adjusted accordingly.
"Copy" and "Paste" are used to move the UVs of currently selected mesh object faces to the swatch UV location of a previously copied swatch. If multiple faces are copied which correspond to multiple swatches, the operator will invalidate the "Copy" operation. UVs must already be in swatch boundaries, and operations between different objects only validate when the STK Atlas material settings match. This works in edit mode only, and on single and multiple mesh objects.
Select the face of the mesh object that you want to copy the swatch of and press the "Copy" button.
Select all the faces that you want to use the copied swatch and press the "Paste" button. The UVs of the selected faces will be moved to the copied UV swatch.
1: Updated for Blender 5.2
2: Added a "Custom speed" user definable speed setting to the "Move UVs directionally" section
3: Added info messages for the "Paste" operator, which explain which objects were pasted to and which were skipped due to non-matching materials
1: Ensured addon still works for Blender 5.1
2: Changed the material search paradigm to "find any match anywhere in the string."
1: Updated for Blender 5.0